Documentation
Automations: your first welcome menu, step by step
At the end, every new customer who writes to you gets a welcome menu with your products, their order status, your opening hours and a way to reach your team, and you see how many people used each choice.
What you need
- Pro plan and up; the AI step: Business plan and up (see the plans)
- Customer messages reaching your store: “Webhook receiving” is green in Connection Doctor
- WooCommerce, for the product and order steps
- Recommended: the inbox app on your phone with notifications on, so hand-overs to your team reach you
Automations only answer customers who write to you, inside WhatsApp’s 24-hour window, so they need no template. As of 31 October 2026: since 1 October 2026, Meta charges for replies, the automation’s answers included. The first 1,000 each month on each WhatsApp number cost nothing; after that Meta charges its service rate for the customer’s country. A chat that starts from your click-to-WhatsApp ad costs nothing for up to 7 days. The Account health screen shows what you pay.
Build a welcome menu
-
Start from the ready “Welcome menu”
In WordPress, open WAPI Connect → Automations and press “New automation”. Choose “Welcome menu” (“A menu for every new customer: products, order status, opening hours, talk to the team.”). The other ready automations are “Choose the language”, “Products in the chat”, “Order tracking”, “AI assistant”, “Outside working hours”, “Customers from ads” and “Start from scratch”.
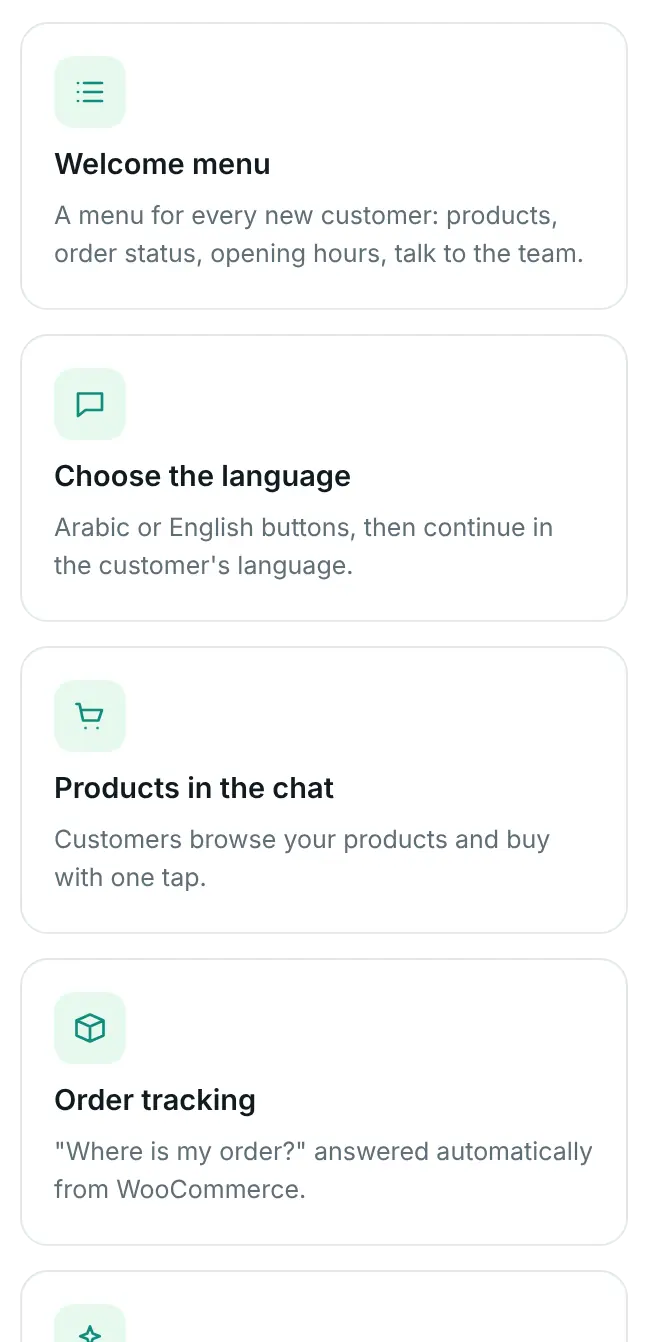
WAPI Connect → Automations → New automation: the ready automations, each with one line on what it does. “Welcome menu” is the first. These are the first 4 of 7; the other three and “Start from scratch” are further down the window. Demo store data. -
Look at the canvas
The automation opens on a canvas, switched off. Every box is a step, and the lines show where each answer goes:
- “Starts when”: “First message” (a customer who has never written to you) and “Keyword” (“menu”, «القائمة», “hi”, «مرحبا», «السلام عليكم» and a few more, matched exactly).
- “Send a message”: the welcome text with your store name on top and a menu button, “Choose”, with four choices: “Our products”, “Track my order”, “Opening hours” and “Talk to our team”.
- “Show products”: your best sellers, up to 10, each with a “Buy now” button that opens checkout with the product in the cart.
- “Customer’s orders”: the status of the latest 3 orders of the number the customer writes from. Unpaid orders get their payment link.
- “Talk to a person”: hands the chat to your team.
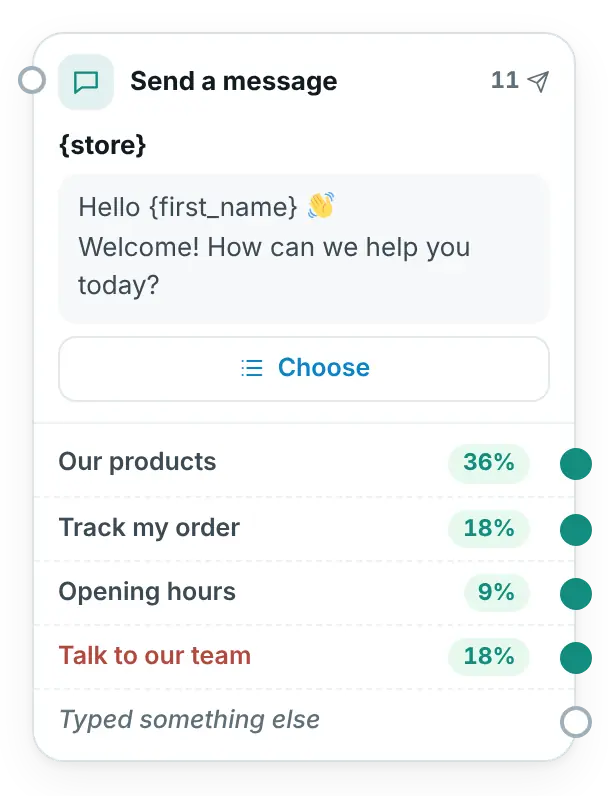
One box on the canvas: the “Send a message” step with the welcome text and its four choices. Once customers use the automation, 11 shows how many got this message and the % next to each choice the share of them who tapped it. {store} and {first_name} are blanks filled in for each customer. The choice in red hands the chat to your team; the grey line in italics is the path for a customer who types something instead of tapping. The choice in red is the one that hands the chat to a person. Demo store data. -
Make the texts yours
Click a step to open it in the side panel, with a WhatsApp preview at the top. Change the text in “Message”; under it, “Insert:” adds
{first_name},{name},{phone}or{store}. Do not skip the opening-hours step: the ready text says 9 am to 10 pm, so write your own hours.To change where a choice goes, use “Where each answer goes” in the side panel, or drag from the choice’s dot on the canvas to another step. “Typed something else” is the path for a customer who types instead of tapping. A customer can also type a choice’s name or its number.
-
Check the hand-over
Open “Talk to a person”. The customer gets its “Message to the customer (optional)”, your team gets a notification in the inbox app, and the chat is marked as waiting. “Pause automations in this chat for” (12 hours in the ready automation) keeps the automations quiet in that chat for that long, or until you mark the chat as done in the inbox.
Words like “agent” or «موظف» reach your team from any step, even in the middle of a question. You can change that list under “Settings” on the Automations screen (“Words that hand the chat to your team”).
-
Save and fix what it finds
Press “Save”. The button at the top then says “Ready”, “… tips” or “… to fix”. Click it to see each point; clicking one takes you to that step. An automation with something to fix cannot be switched on.
-
Switch it on
Turn on the switch next to the name at the top: it says “On” and you see “Automation switched on.”. From now on, new customers get the menu, and anyone who writes one of the keywords gets it again.
Test it on your phone
- From your own phone, send any message to your WhatsApp business number. WhatsApp only lets the store answer for 24 hours after it.
- In the automation, press “Try it”, write that phone number in “Your phone number” and press “Send”. You see “Sent! Check your WhatsApp.” and the menu arrives.
- Tap the choices and check each answer.
Your own number has already written to the store, so “First message” will not start for it again. To test the real start, send “menu” from your phone, or ask someone who never wrote to the store to say hello.
Change it while it is on
While an automation is on, customers keep getting the published version. Your edits are kept as a draft: the button says “Save draft”, an “Unpublished changes” pill shows next to the name, and “Try it” sends you the latest saved version. Press “Publish” when you are ready: “Published. Customers get the new version now.” To throw the edits away, click the pill and choose “Discard the changes”. A version with something to fix is never published.
Switching an automation off ends it for the customers who are in the middle of it.
Read the numbers
- On the Automations list, each automation shows “People”, “Started” and “Last run”.
- In the editor, the bar on top of the canvas counts people, started, finished and handed to the team.
- Each step shows how many times it was sent, and each menu choice how often it was tapped, as a percentage of the messages sent. Click a step: “Numbers” in the side panel shows Sent, Delivered, Read, People, Failed and the taps on each button.
- The “Numbers” box at the bottom of the canvas hides or shows them while you work.
The AI step (Business plan)
An AI step answers questions about your store and products in the customer’s language, using what you write and, if you want, your products. It uses your own key with an AI provider, says it is automatic in its first answer, and hands the chat to your team when it cannot help, when the customer asks for a person, or when anything goes wrong.
Before you start
- Business plan and up
- A paid API key from Anthropic, OpenAI, or a service that works like OpenAI’s
- The App Secret of your Meta app saved in WAPI Connect → Settings → WhatsApp API → “App Secret”. Without it the AI step cannot be switched on: the App Secret makes sure only Meta can send messages to your site, so nobody else can spend your AI credit. The webhook guide shows where to find it.
-
Save your key
On the Automations screen, press “Settings”. Under “AI replies”, choose the “Provider” (“Anthropic (Claude)” or “OpenAI or compatible”), paste your key in “API key” and leave “Model (optional)” empty unless you want a specific one. “API address (optional)” is only for OpenAI-compatible services, with an https:// address.
Press “Save and test the AI”. A ✅ with a short answer from the AI means the key works. The key is never shown again; the field then says “Saved key ending in …”.
-
Add the AI step
Press “New automation” and choose “AI assistant”, which answers “Any other message”, or add an “AI reply” step to an automation you have with “Add a step”. Then fill in:
- “Greeting when the step starts (optional)”
- “How it should answer”: the tone and the rules, for example “Be warm and short. Never give discounts.”
- “Store information”: opening hours, delivery areas and prices, return policy, payment methods, frequent questions.
- “Also give it my products with prices and links”
- “Stop after this many answers” and “Words that end the AI chat” (such as “menu”, which then follows the “Finished” path)
Connect the “Needs a person” path to a “Talk to a person” step. Save, try it on your phone, then switch it on.
Every AI answer is checked: an error, a refused answer or a cut-off answer hands the chat to your team, and the AI settings and the AI step show what the provider said. Each customer gets up to 40 AI answers a day and the whole store up to 500; after that, a person takes over. Before a message goes to the provider, the plugin hides login codes, card numbers (also split by spaces or sent in parts), IBANs and Kuwait Civil ID numbers; order numbers, prices and phone numbers stay. Only the copy sent to the AI changes.
To your AI provider
The provider bills your own account for what the AI uses.
To Meta
Each AI answer is a reply in the chat, charged like your other replies (as of 31 October 2026).
Your privacy policy
The customer’s messages in the AI step go to your provider. Mention it in your privacy policy; see privacy and consent.
Check that it worked
- The Automations list shows your automation switched on, without “… to fix”.
- “Try it” brings the menu to your phone, and each choice leads where you expect.
- After a test, “People” and “Started” go up, and the chat shows in the inbox app with the automation’s messages.
Common problems
The switch will not turn on
The automation has something to fix. Click the “… to fix” button at the top: typical points are “Choose when this automation starts (a keyword, the first message, a link, an ad…).” and “Connect the start to the first step.”
“Try it” says to send a message first
The store has no chat with that number yet. Send any message from that phone to your business number, check that it shows in the inbox, then press “Try it” again.
A customer wrote and nothing answered
Check, in this order: the automation is on; sending is on in Settings → General (the Automations screen shows a notice when it is stopped); a person replied in that chat from the inbox in the last hour (automations wait, see “After a person replies from the inbox, pause automations in that chat for” in Settings); the chat was handed to your team and is not marked done yet; the customer wrote before, so “First message” does not start for them.
The tips say another automation already uses this trigger
Two switched-on automations start on the same thing, for example the first message. The older one answers first. Keep one, or give the other a keyword or a link.
Customers still get the old texts
The automation is on and your changes are a draft. Press “Publish”.
Hand-overs do not reach my phone
Install the inbox app and turn notifications on. Until a phone has notifications on, the Automations screen says so and hand-overs are e-mailed to the WordPress admin address instead.
The AI step says it needs a key, the App Secret or the Business plan
Save your key under Settings → “AI replies” and press “Save and test the AI”, save the App Secret in Settings → WhatsApp API, and check your plan under Settings → License. The step also stays off when AI is turned off for the whole WordPress site.