Documentation
Install the plugin and activate your license
At the end, WAPI Connect Pro runs on your store, your screens are in your language and your license is active, so updates arrive through WordPress.
What you need
- A store that meets the requirements
- An administrator login to your WordPress
- Your purchase e-mail, with your license key
Steps
-
Download the plugin
Your purchase e-mail has your license key and a link to your receipt. The receipt shows the key again and the download link for the plugin, one .zip file. You also find your orders and downloads in My account.
Keep the file zipped. Safari on a Mac opens zip files by itself: if you get a folder instead of a .zip file, download it again with that option off, or use another browser.
-
Upload it to WordPress
In WordPress open Plugins → Add New Plugin → Upload Plugin. Choose the .zip file, press “Install Now”, then “Activate Plugin”. A new “WAPI Connect” item appears in your admin menu.
Nothing is sent to customers yet. The plugin itself, order messages and cart reminders all start switched off, and you turn each on when it is ready.
-
Choose your language
The plugin screens start in Arabic. To change them, open WAPI Connect → الإعدادات (Settings, the last item in the menu) → عام (General). The first field, «لغة الإضافة (للشاشات التي تستخدمها)» (Plugin language, your screens), is the language of your own screens: choose “الإنجليزية (English)”, or «نفس لغة ووردبريس» (Same as WordPress). Press «حفظ الإعدادات» (Save Settings).
The next field, «لغة العملاء» (Customer language), is separate: it sets the language of your WhatsApp login page, checkout text and the templates your customers get.
-
Activate your license
Open WAPI Connect → Settings → License. Paste the key from your purchase e-mail and press “Activate”. You see “License activated”, followed by your plan.
The card now shows the end of your license key, your plan, its status, the renewal date, how many sites use the key and the last check. The plugin checks the license once a day by itself; “Check now” does it right away.
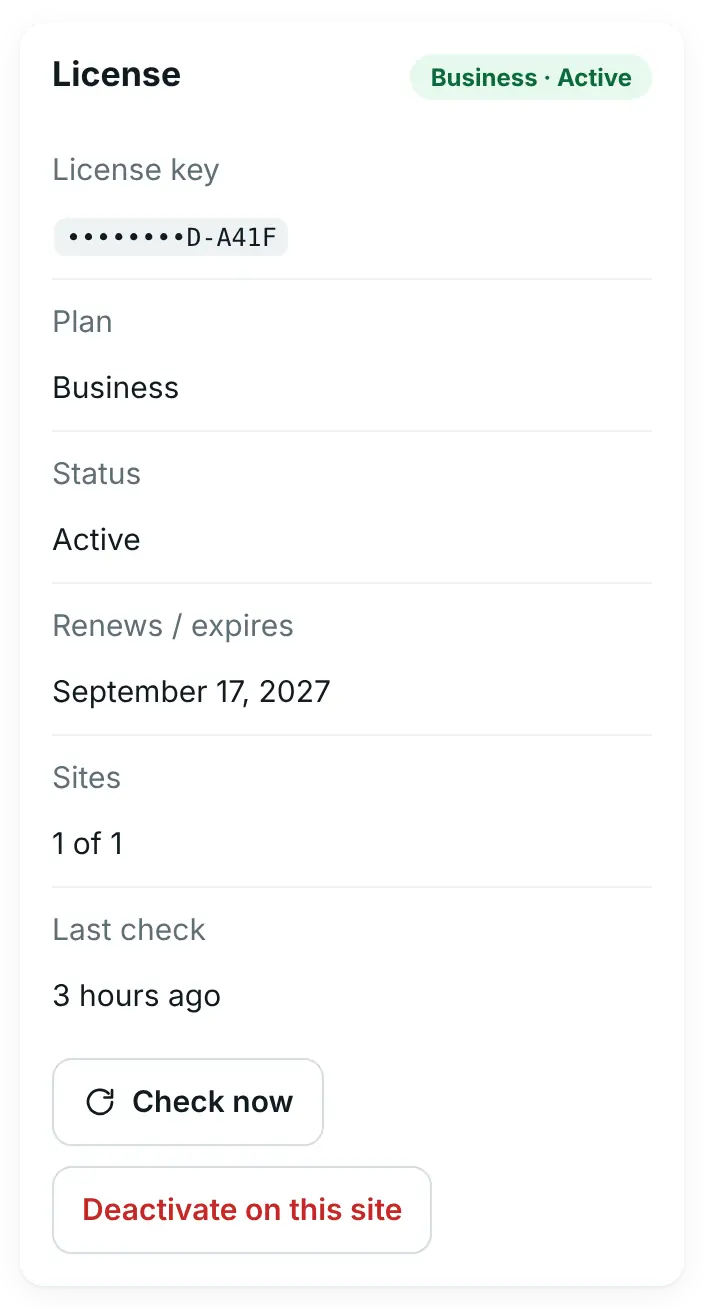
WAPI Connect → Settings → License after activation, here with a Business key: “Active” means the key works; the key is hidden except its last characters; “Sites 1 of 1” is how many sites use it out of how many it allows. Demo store data. -
See what is left to set up
Open WAPI Connect → Overview. The “Setup” card lists each part, from “WhatsApp API details entered” to “License activated”, with a “Set up” button next to anything still open. The next part is connecting WhatsApp with Meta.
Check that it worked
- Settings → License shows your plan with “Active” next to it
- “License activated” is ticked in the Setup card on WAPI Connect → Overview
- WAPI Connect → Health & tools → System status shows a tick next to PHP, WordPress and WooCommerce
Updates
New versions arrive like any other plugin update: WordPress shows them in Dashboard → Updates and on the Plugins screen, and you press “Update now”. Your settings, contacts and chats stay as they are.
Updates need an active license on this site. Without one, WordPress still shows that a new version exists, with the note “Activate or renew your license to update.” and a link to the License tab. If you just activated or renewed and the update does not show yet, press “Check now” in Settings → License, then check again in Dashboard → Updates.
Renewing
Your license runs for one year. From 30 days before the end date a “Renew” button appears in Settings → License. If the date passes, the plugin keeps working for a 14-day grace period and shows how many days are left; after that its WhatsApp features pause until you renew, and your settings and data stay as they are. It opens the checkout with your key, and renewing adds one more year to the same key, so there is nothing to paste again. The plugin picks up the new date at its next daily check, or right away when you press “Check now”. See pricing.
Move your license to another site
Starter, Pro and Business work on 1 site, Agency on 5. To move a license:
- On the old site, open WAPI Connect → Settings → License and press “Deactivate on this site”.
- Confirm the question “Remove the license from this site? You can activate it on another site.” You see “License removed from this site.”
- On the new site, install the plugin and activate the same key, as in step 4.
Deactivating the plugin or deleting it from Plugins does not free the license. Press “Deactivate on this site” before you delete the plugin, close the old site or move it to a new address. If the old site is already gone, open a ticket and we free it for you.
- https:// or http://, with or without www: the same address counts as one site.
- A staging copy on another address, such as staging.your-store.com, counts as another site.
- An expired key cannot start on a new site. Renew it first.
- Changing to a bigger plan? You get a new key: deactivate the old one, then activate the new one. See pricing.
Common problems
“This license key does not exist. Check it in your purchase e-mail.”
Copy the whole key again from your purchase e-mail or receipt and paste it. Check that it is the WAPI Connect Pro key and not an order number.
“This license is already used on all the sites it allows.”
The key is active on as many sites as your plan allows. Press “Deactivate on this site” on the site you no longer use, or upgrade the plan. If you cannot reach that site any more, open a ticket.
“The license is not active on this site. Activate it again.”
This happens after a site moves to a new address with the old license settings. Activate the key again in Settings → License. If it then says all sites are used, ask us to free the old address.
“Could not reach the license server: …”
Your server could not reach wapiconnect.net, often because of a firewall or a short outage. Nothing changes on your site: the last known license state stays. Try “Check now” later, or ask your host to allow outgoing connections to wapiconnect.net.
“This license was disabled (refund or misuse). Contact support.”
The key was switched off, for example after a refund. Open a ticket if you think this is a mistake.
“Running without WooCommerce: …”
This is a note, not an error. Without WooCommerce, the inbox, automations, campaigns, contacts, calls and account health all work. For order messages, cart reminders and WhatsApp checkout, install and activate WooCommerce 7.0 or newer from Plugins: they then appear in the WAPI Connect menu.
WordPress says the file is not a valid plugin, or too big
Upload the .zip file exactly as you downloaded it, not an unzipped folder. If WordPress says the file is too big, ask your host to raise the upload limit.